
My Art Process – Photographing Artwork
Once you have finished creating any art piece, you should always photograph it! Whether you want to show it off to your friends and family or submit it to an art contest, photographing artwork is a very important step in creating art.
Cameras
Any camera that you have will most likely work when photographing your art. Unless you are very serious about your art and taking good pictures, don’t go out and buy a new camera just for photographing artwork. If you own a digital camera, that’s great! But you can always use your phone camera to get professional looking photos as well.
2D Artwork
When photographing 2D artwork, you will need to keep two things in mind – lighting and angles. You’ll want to start with lighting. Find an area with natural light that isn’t too harsh. Set your piece up near a window or other source of natural light. Make sure that there are no obvious shadows over your piece. Then, you need to get both your artwork and your camera at the right angle. You want it to be straight a straight-on shot so that the entire piece is visible and nothing is distorted. Take multiple pictures, changing the angle slightly so you can choose the best one later.
3D Artwork
Unlike 2D art, when photographing 3D artwork, you will need to also need to have a plain, professional looking backdrop. If you take art classes, ask your teacher if they have any equipment that you can use. When taking photos at home, however, you do not need to spend any money. If you are photographing a larger piece such as a wearable garment, you can simply use a plain wall in your house. If you don’t own a tripod, use a table or chair to set your camera or phone on to get the desired height. When photographing a smaller piece, you can create a basic background using paper. Use two pieces of paper and have one on a wall in the back and one on the ground. This will create a basic yet professional looking background using items you already have at home! Make sure to use either black or white paper for high contrast.
Editing
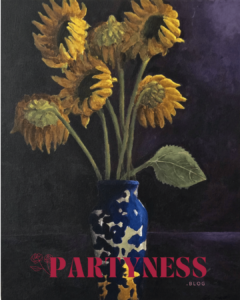
When editing, try to make the image look as similar as possible to your artwork in real life. I like to have my piece next to me while I am editing, especially to get the colors to look right. You can use any editing software you are comfortable with, whether it be Photoshop, Canva, or even just your phone’s photo editor. Remember that you are not trying to make your artwork look “better,” but you are trying to show off your artwork as if the viewer was seeing it in real life. For example, in the artwork shown I adjusted the colors to look as dark as they look in real life while also showing the texture that was created while layering paint on the canvas.
Now that you have finished photographing your artwork, you are finally done! You should be proud of finishing this process, no matter if you like how your piece turned out or not. You spent so much time working on your piece, and even if it’s not what you expected, you learned something from the process and you should be happy for yourself!