
Creating Her Choice – My Art Process – Fashion
Her Choice is a dress which I made as more of an art piece and political statement than an everyday dress. This piece won a regional Scholastic Gold Key award. In previous blog posts, I discussed my art process and how I create both 2D and 3D artwork. In this post, I will discuss how I created the dress which I call Her Choice, from ideas to sketches to sewing the dress.
Ideas & Inspiration
For this piece, I started with the idea that I wanted to create a garment that represented feminism in some way. I then narrowed the broad idea of feminism down to women’s rights and supporting pro-choice. Although I did not have the idea on how to represent it yet, I knew I wanted to portray this using certain elements. I wanted something to represent other people telling women what to do, and another element that represented the beauty and strength of women. In this stage, don’t feel like you need to know how you are going to do something. All that matters is that you have an idea, and eventually, you will be able to make it come to life.
Sketches
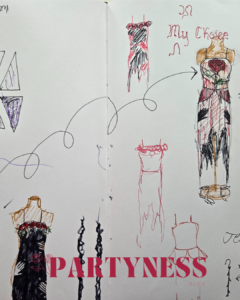
I spent quite a while trying to figure out the design of this piece. So much so that this was the longest time that I have ever taken to finalize an idea before starting it! I had many different ideas; I just had to get them down on paper. Like I said above, I wanted an element representing people telling women what to do. This is where I decided on adding hands to the dress. I also wanted an element representing the strength and beauty of women, which is where the roses come in. In this step, make sure to not only sketch out your ideas but also write down any notes you have and reasoning for certain elements.
Of course, your first sketches will most likely not be what your final project looks like. This sketchbook spread is just one of many where I was planning out the design. Eventually, I did go back to the sketch in the bottom left as the idea for my final dress. There were many sketches that came before it and even many after it before I decided on the final design.
Sewing the Base
For the base dress, I used fabric that I already had and cut out a shape based on a dress that I already owned. If you plan to do something similar, make sure that the fabrics are similar, for example both stretchy, thin, thick, etc. I then sewed the pieces together and added the straps. I created the bottom hemline by cutting strips up the dress. I then used a zig-zag stitch to sew the raw edges while pulling the fabric to create the wavy effect. This is often called a lettuce edge hem. I also created individual strips with this hem and sewed them higher up on the dress.
Adding Details
The final part of making this dress was adding the details. First, I crocheted the flowers and then used embroidery thread to sew them onto the dress. I opted to use a thicker thread because of how heavy the flowers were, and I didn’t want the thread to snap. The next part was the handprints. I created a “fabric paint” by mixing white acrylic paint and hair conditioner. This allowed it to not crack while it was drying. I then used my own hand to stamp the paint onto the front of the dress and let it dry overnight. I sewed beads onto the hands after it was dry.
Taking Pictures
Once the dress was done, I needed to take pictures of it. I found a blank wall and set up my phone camera to take pictures. When editing, I made sure to edit the colors to be as similar to what it looked like in real life.
The final product was exactly what I imagined it would be! This is your reminder that art takes time, and you can make your best work when you spend time on it and don’t rush the process.